We Live in a DIY World
We get it—there’s nothing more satisfying than doing something yourself. With tools such as Canva and Publisher, more and more people are jumping feet first into designing things themselves. Which can be a lot of fun until it’s time to print your file.
Here, we review the various file requirements we have when you send us your DIY file so that it’s print-ready and looks just how you imagined it!
Every Print Shop has file setup instructions tailored to accommodate their specific equipment. Let’s review how we need your file setup:
OUR FILE REQUIREMENTS
• All files should be saved as a PDF—no exceptions. Our production printer ONLY prints PDFs.
• The following file formats will not be accepted as a print-ready file: .png, .jpg, .doc, .psd, .pub, .ppt, .xls, .ai, .svg.
• There should be NO crop marks, printer marks, registration marks, or filenames shown in the PDF. Our production printer does not require any of these things.
• All files need to be 300dpi which is the industry standard for high-resolution quality. 99% of the time files saved off of the internet are considered low resolution and will not print crisply.
• All files must have BLEED included! The ONLY exception is color copies that don’t have color/photos extending to the edge of the page. See instructions on next page.
• All files must be provided at 100% of the size printed. If they need to be resized, there will be an additional fee charged for that.
It is your responsibility as the creator of your file to provide it according to our printing
specifications. If you are unable to do so, we’d be happy to assist in making your file print ready however depending on how much time is involved, there may be a fee incurred.
Be advised, we exclusively use professional software (Adobe CC) therefore we cannot assist in making changes to any files not created in Photoshop, Illustrator, InDesign, Word, Excel or PowerPoint.
PRO TIPS
• Often times, photos taken off of the internet are copyrighted. This includes photos from websites, photos of books, and anything with a watermark on it. It is our policy NOT to print copyrighted files as it would be in violation of copyright laws.
• Most files taken off of the internet are too low in resolution for printing and will print fuzzy. This includes any image taken off of Facebook, any website or a Google image search.
PROPER FILE SETUP
IMPORTANT DEFINITIONS
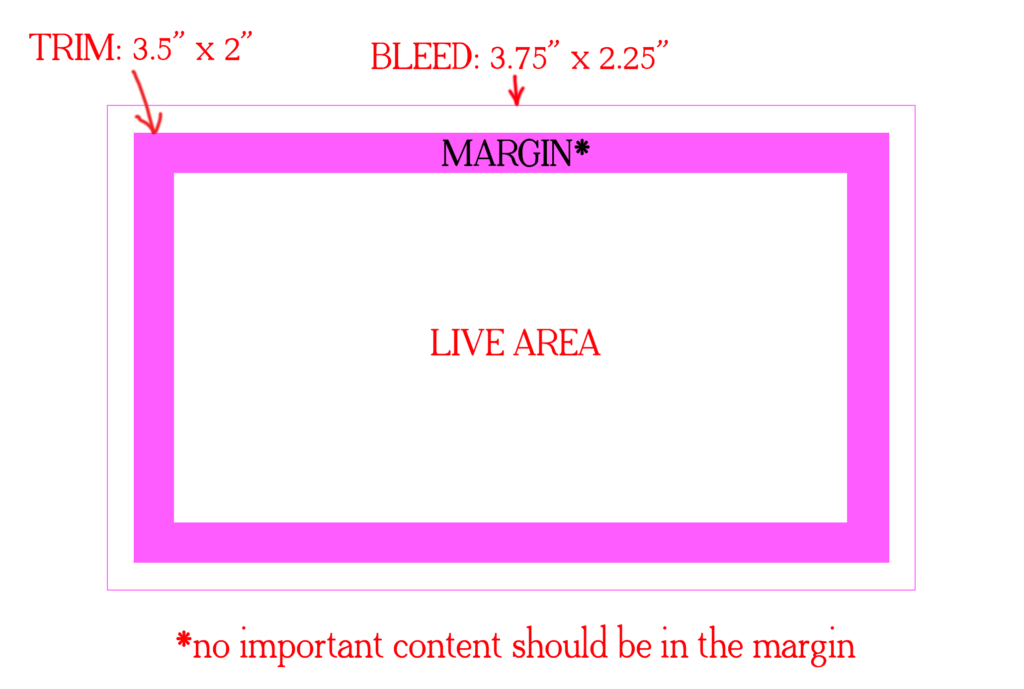
LIVE AREA Also commonly referred to as SAFE AREA, the Live Area is where the majority of your content should be located.
MARGIN The Margin is the space between the Live Area and the edge of the page where it will be trimmed. No important information such as text or logos should be in this area.
TRIM The edge of the page where the document will be cut.
BLEED An additional area that extends OUTSIDE of the Trim Area. A Bleed is necessary if you want any color or image to go right up the edge of the page. This area is an additional .125” added to the Trim Area. Example: If you want to print a business card with a red background that goes all the way to the edge of the page, you will have to add a Bleed. So while the Trim Size is 3.5” W x 2” H, your final file size should be 3.75” W x 2.25” H (3.5” x 2” plus .125” added on all 4 sides.
HELPFUL LINKS
If you’re using any of the following programs/apps to create your artwork, here are links on how to create/add Bleed to your document:
CANVA
https://www.canva.com/help/article/margins-bleed-crop-marks/
MICROSOFT PUBLISHER
https://support.microsoft.com/en-us/office/create-a-bleed-for-your-publication-2696da57-3986-4ef0-9393-e21cfcf83a9c
MICROSOFT WORD
https://support.microsoft.com/en-us/office/create-a-bleed-for-your-publication-2696da57-3986-4ef0-9393-e21cfcf83a9c
PROCREATE
https://mycreativeapproach.com/how-do-i-add-bleed-to-a-design-before-printing/
PHOTOSHOP
https://creativepro.com/photoshop-how-to-adding-bleeds-and-crop-marks/
Should you have any questions, please contact Beth Sutton at (706) 400-5540 or team@blairsvilleprinting.com.
>Click HERE to download this post as a PDF.